Wednesday, September 28, 2011

DIY Bedazzled Flats

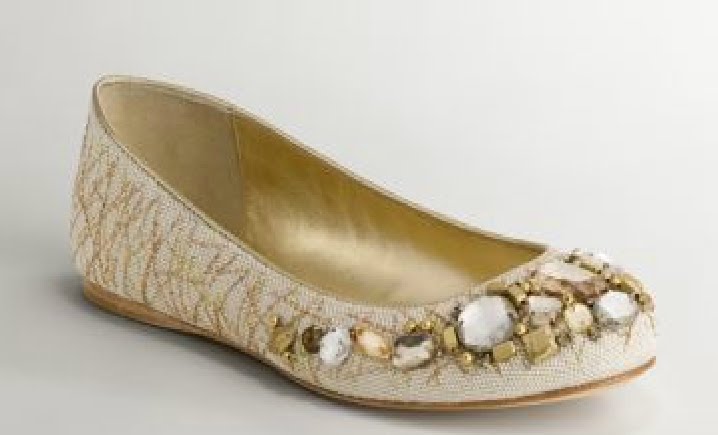
Well...it's finally fall, which means it's about that time to retire those flip flops for the season, and bring out the flats! My personal favorite flat is round toe and somewhat bedazzled (in an understated somewhat professional fashion); after browsing on bloomingdales.com and remembering my love for my old banana republic flats, I decided this would be my next project.
These babies are my inspiration


What you'll need..
1 pair of canvas, pleather or leather (for the more expensive taste) flats
jewels of all sizes, shapes and colors (it's all up to your own personal preference)- I picked 10 of the exact same gems because I like things simple and symmetric!
hot glue gun

I chose these Lower East Side Flats from Payless $16.99


These gems from beadworld in manhattan $12.50 for 10


To begin, I pulled the backing off the gems


Then I placed a small dot of hot glue in each of the backings and glued the gems back into place (this ensures your gems don't fall out of the backing)
Now that your gems are all set to go, formulate a pattern and test it out by placing each piece on the top of your shoe


When you're happy with placement, start to glue each piece onto the shoe, NOTE you only need a small amount of glue, also begin with the middle piece and work out from there.

and ta Da!..custom bedazzled shoes!

Pin It

Tuesday, September 27, 2011

Thoughts, and a twirly scarf!

Happy Tuesday! My crafts or I should say crocheting at this point is starting to come along, apologies for not posting consistently just yet. I'm so new to crafting and the blogosphere; I've decided at this point to post at my own pace which for right now will be around twice a week. I can't wait to see this blog when it reaches its full potential; I've been browsing around DIY related blogs, and I'm absolutely amazed by the creativity not only of the projects that make their way on there but the presentation of the blogs themselves. For now as I am a NOVICE at all that is crafty and computer related, I'm using the blogger template, but up there on my priorities list is to learn to write code and create a much more ascetically pleasing blog for you all! In the meantime, here's a pretty twirly scarf to work on, it makes a great accessory for fall!


What you need:
K Crochet Hook
2 balls of yarn
scissors or darning needle

Create a slipknot
Chain 110
Row 1: Double crochet in 4th chain from the hook, *double crochet in next chain, 2 double crochet in next chain; repeat from *across
Row 2: Chain 3, turn double crochet in first double crochet, *double crochet in each of next 2 sitches, 2 double crochet in next stitch; repeat from * across
Row 3: chain 3, turn double crochet in first double crochet, *double crochet in each of next 3 stitches, 2 double crochet in next stitch; repeat from * across.
Row 4: chain 3, turn, double crochet in first double crochet, *double crochet in each of next 4 stitches, 2 double crochet in next stitch; repeat from * across.
Fasten off

TIP: the only confusing part about this pattern is the 2 double crochet, this direction actually calls for you to double crochet twice in the same chain, see youtube video below for tutorial on 2 double crochet.

Saturday, September 24, 2011

Recycling old clothes for Yarn

Can't get to the craft store, but you're dying to dive into your next project? There could be an easy solution to your problem. As the seasons change and you bring those old sweaters down from the attic, you might notice that they're either a. out of style b. damaged (holes, stains, etc), or c. don't fit. Istead of tossing the item, consider recylcing it and using the yarn for a new project.

The process is easy really, just make a cut in the yarn where the sweater is joined and begin pulling, in no time you'll have a ton of yarn! If you had a stain on your yarn, just cut those parts out with a scissor, and tie a knot to join the remaining yarn.

Congratulations, you just saved money, and the environment!

Tuesday, September 20, 2011

High Fashion Crochet Inspiration

Thought I'd post some designer crochet pieces, hopefully this will provide a little inspiration to get you working harder on the basics; once you master all your stitches, and probably a ton of garments, maybe we can create something like this.(everyone needs goals!)

Monday, September 19, 2011

Beginners Scarf & stitch tutorials

Take a look at these tutorial videos that I've created, I demonstrate how to create a slipknot, chain, single crochet, double crochet; as well as how to create the white double crocheted beginners scarf from my earlier post. Hope these help!


Thursday, September 15, 2011

Beginners Scarf

My very first Scarf! It took a little trial and error and a few google searches and youtube tutorials but I finally got it down! Follow this simple pattern and you'll have a beautiful finished scarf in just a few hours.

Materials: Size K Hook; 1 ball of Patons Canadiana White yarn
Chain 16
Row 1: Double crochet in the 4th chain from the hook and in each chain across.
Row 2: Chain 3, turn, double crochet in each double crochet across.
Repeat Row 2 until you've reached your desired length
Fasten off

Wednesday, September 14, 2011

The Start

First and foremost I'd like to say welcome to my blog! I'll begin with a little intro of myself so you get the jist of why I felt the need to create this.  I'm 25, I work your typical 9-6p job in NYC; and while I like what I do, I've been struggling with the feeling that my creativity is being suppressed. That said, I decided one day to pick a crochet hook and some yarn, and voila! my journey begins.  As the weeks, and months go on, I will take you through my journey of learning how to crochet, knit, sew, draw and paint; I'll include tips and some tricks I've figured out through my own trial and error.